Experimental Game Development
by Phoenix Perry and Jane Friedhoff
additional edits by Kayla Lewis
Game developers are, in greater and greater numbers, turning to openFrameworks' creative coding toolkit to develop their games. Unlike platforms such as Unity, GameMaker, and Construct2, OF was not specifically developed for game makers. However, OF's ability to port to mobile, manipulate video, utilize camera input, support generative graphics, and hook in with devices like Arduino and Kinect (among other features) makes it a very attractive option for developers who want to be able to rapidly produce compelling, unique games.
Popular games made with openFrameworks


In this chapter, we'll learn about game development in openFrameworks. We'll cover what goes into making a game, as well as how to code a simple space shooter. Finally, we'll put an experimental oF twist on our game by implementing OSC functionality, which will allow you to alter the difficulty of the game live (while the player is playing it).
Ready? Let's go!
How do game developers actually make games?
There are as many ways to make games as there are game developers. However, many developers follow an iterative process: adding a single component, testing it, adding an additional component, testing it again, and so on. Regardless of the platform, this method allows game developers to quickly figure out what parts of the initial idea are worth keeping and test additions they think might be interesting without wasting time building a complete game that, in retrospect, isn't compelling.
This iterative process can be done digitally or physically. Paper prototyping is the process of testing mechanics and interactions with paper models and analogs. Although these paper prototypes don't necessarily look like the final game, they can be mocked up quickly, allowing developers to experiment with core mechanics more rapidly than they could with code. For example, a puzzle game's board and pieces can be mocked up with paper and dice quicker than it can be implemented in even a basic mobile app. Similarly, when a developer makes a digital prototype, or one with code, they will start by refining game mechanics and keeping assets rough until they get closer to the end. Finally, developers enter the long process of tuning their game–tweaking various parameters until it feels just right.
We're going to use openFrameworks to play with the final step of this process. In the game we're making, we're not going to settle on one set of parameters that stay static from game to game. We're going to use openFrameworks' OSC library to allow us to communicate wirelessly from another device (e.g. a smartphone or tablet) so we can tune those parameters live, giving our players experiences tailored just for them.
So what is OSC, anyway?
OSC, or Open Sound Control, came about as an advancement to MIDI, so let's talk about MIDI first. MIDI is a data protocol that sends and receives information between devices, typically electronic musical instruments. MIDI is what allowed things like keyboards and drum machines to fire in sync. If you've heard pop music, you've heard MIDI in action.
MIDI has data channels, on which you can send or receive single messages, or events. Programmers could associate these MIDI events with actions that their electronic instruments could take. For example, you could set up your keyboard to send data on channel 1, and receive data on MIDI channel 2. More specifically, you could program a specific key (say, the 'a' key) to send out a MIDI event on channel 1. If your drum machine is set up to receive on channel 1, it will receive that message and perform the appropriate action (e.g. playing). A pretty cool system, but one that was limited by its pre-defined and discrete message types.
As time advanced, so did computers and the speed of data transfers, leading us to OSC. OSC was designed to allow for more expressive performance data, with different, flexible kinds of messages sent over networks. OSC is a thin layer on top of the UDP (User Datagram Protocol), and allows users to send information over networks just by specifying the network address and the incoming and outgoing ports. (UDP is used frequently in games, and it is possible to use both of these protocols at the same time in the same code base with no issues.)
OSC messages consist of the following:
- An address pattern. This is a hierarchical name space, and looks a bit like a Unix filesystem or URL (e.g.
/Address1). These patterns can effectively be anything you want (e.g./EnemySpeed)--think of them as names for what you send. - A Type tag string. This simply represents the kind of data being sent (e.g.
int,string). - Arguments. The actual value that is being transmitted (e.g.
6,"Hello world", etc.).
There are plenty of inexpensive apps for smartphones and tablets that provide customizable GUIs (complete with buttons, sliders, etc.) for sending different kinds of MIDI messages. Download one (we like TouchOSC) so we have something to send our messages with. With this in mind, let's start making our game!
Our basic game–and making it not so basic
OpenFrameworks handles OSC as an included addon, so our first step will be to run the project generator and create a project with the OSC addon. (If you haven't had a chance to read about addons, now would be a good time to jump over to [here] and do just that!) Launch the project generator, then, in the main menu, click the word "Addons." A popup will appear. Select ofxOsc and then click back. Now, next to the word Addons, you should see ofxOsc. Press "generate". When it completes the project creation process, close the generator and open up the project in either Visual Studio or Xcode. The project will be set up in your myApps folder. Open it now.
Here's what our game will have:
- A player, who has an on-screen position, a movement speed, and an image to represent it
- Some enemies, who have an on-screen position, a movement speed (with the horizontal value based on a sine wave), an image to represent them, and an interval to keep track of when they can shoot next
- A level controller, which has an interval to keep track of when an enemy should be spawned next
- Bullets (for the player and the enemies), which have an on-screen position, images to represent them, a way to keep track of where they come from (player or enemy), and a speed
- Bonus lives, which have an on-screen position, an image to represent them, and a speed

With all that written out, let's use OSC to affect the following:
- The horizontal movement of our enemies--whether they move in a more exaggerated sine wave, or whether they move in more of a straight line
- The frequency with which our enemies shoot
- The frequency with which our level controller spawn enemies
- Whether a life bonus is on screen or not
These three parameters will allow the developer to tailor the difficulty of the game to the individual playing it, second-by-second.
Let's start with our ofApp. There are a few things we definitely know we'll want classes for, so make corresponding .h and .cpp files for Player, Bullet, Life, Enemy, and LevelController. Remember to #include "ofMain.h" in each of those classes, and to include the .h file of each of those classes in ofApp.h.
Gamestates
First let's create the basic structure of our game. Games typically have at least three parts: a start screen, the game itself, and an end screen. We need to keep track of which section of the game we're in, which we'll do using a variable called game_state. In this example, our game_state variable is a string, and the three parts of our game are start, game, and end. Let's add a score and a player at this point as well.
string game_state;
int score;
Player player_1;
We'll then divide up ofApp's update() and draw() loops between those game states:
//--------------------------------------------------------------
void ofApp::update(){
   if (game_state == "start") {

   } else if (game_state == "game") {
   } else if (game_state == "end") {

   }
}
//--------------------------------------------------------------
void ofApp::draw(){
   if (game_state == "start") {
   } else if (game_state == "game") {
   } else if (game_state == "end") {

   }
}
Let's set the initial value of game_state to "start" right when the app begins.
//--------------------------------------------------------------
void ofApp::setup(){
   game_state = "start";
  score = 0;
}
Finally, let's make sure that we can move forward from the start screen. In this example, when the player is on the start screen and releases the space key, they'll be taken to the game.
//--------------------------------------------------------------
void ofApp::keyReleased(int key){

   if (game_state == "start") {
       game_state = "game";
   } else if (game_state == "game") {
      // blank for now
   }
}
Player movement
Great! Let's move onto our player. Our player's class looks like this:
class Player {
public:
   ofPoint pos;
   float width, height, speed;
   int lives;

   bool is_left_pressed, is_right_pressed, is_down_pressed, is_up_pressed;

   void setup(ofImage * _img);
   void update();
   void draw();
   void shoot();

   void calculate_movement();

   bool check_can_shoot();

   ofImage * img;

};
Taking this one step at a time:
- Our player's position will be stored in an
ofPointcalledpos. ofPoints are handy datatypes that containxandyvalues, letting us access our player's position throughpos.xandpos.y. - Our player will have
width,height, andspeedvariables (which we'll use for collision detection and movement, respectively). - Our player will have an integer number of lives (since it wouldn't make any sense for them to have 4.33333333333 lives).
- Our player will keep track of what movement keys are currently pressed in separate booleans.
- Our player will have
setup,update,draw,shoot, andcalculate_movementmethods. - Finally, our player will have a pointer to the image we're using for the player.
You may be wondering why we're using all these booleans--why not just check and see which keys are pressed?
The problem is that, in openFrameworks, keyPressed() does not return all the keys currently being pressed--just the last key that was pressed. That means that if the player presses up and left (intending to move diagonally), openFrameworks will only report one of the keys being pressed. You can try printing out the result of keyPressed to see this in action. What we'll do to avoid this is instead base the player's movement on the booleans we wrote earlier. If the player presses a certain key, that boolean will be true; if they release that key, that boolean will be false. That way, if the player presses up and left, we'll report up and left as being true until those keys are released.
Here's what our new keyPressed() and keyReleased() functions look like:
//--------------------------------------------------------------
void ofApp::keyPressed(int key){
   if (game_state == "game") {
       if (key == OF_KEY_LEFT) {
           player_1.is_left_pressed = true;
       }

       if (key == OF_KEY_RIGHT) {
           player_1.is_right_pressed = true;
       }

       if (key == OF_KEY_UP) {
           player_1.is_up_pressed = true;
       }

       if (key == OF_KEY_DOWN) {
           player_1.is_down_pressed = true;
       }
   }

}
//--------------------------------------------------------------
void ofApp::keyReleased(int key){
   if (game_state == "start") {
       game_state = "game";
   } else if (game_state == "game") {
       if (key == OF_KEY_LEFT) {
           player_1.is_left_pressed = false;
       }

       if (key == OF_KEY_RIGHT) {
           player_1.is_right_pressed = false;
       }

       if (key == OF_KEY_UP) {
           player_1.is_up_pressed = false;
       }

       if (key == OF_KEY_DOWN) {
           player_1.is_down_pressed = false;
       }
   }
}
Add ofImage player_image to ofApp.h, then load the player's image and instantiate the player in ofApp's setup():
void ofApp::setup(){
   game_state = "start";
   player_image.loadImage("player.png");

   player_1.setup(&player_image);
}
Finally, update and draw your player in the appropriate part of ofApp::update() and ofApp::draw():
//--------------------------------------------------------------
void ofApp::update(){
   if (game_state == "start") {

   } else if (game_state == "game") {
       player_1.update();
   }
}

//--------------------------------------------------------------
void ofApp::draw(){
   if (game_state == "start") {

   } else if (game_state == "game") {
       player_1.draw();
   } else if (game_state == "end") {

   }
}
You should have a player who moves around on-screen. Sweet!
Player bullets
Let's make our bullets next. In order to have a variable number of bullets on screen at a time, we need to add a vector<Bullet> bullets to ofApp.h. Let's also create a void update_bullets() function, which will update our vector of bullets (and, shortly, trigger the check for bullet collisions). We also want our player and enemy bullets to look different, so we'll add ofImage enemy_bullet_image and ofImage player_bullet_image to our ofApp.h file.
Our bullet class will look a lot like the player class and have a position, speed, width, pointer to an image, and various functions. The big difference is that the bullets will keep track of who they came from (since that will affect who they can hurt and which direction they move).
class Bullet {
public:
   ofPoint pos;
   float speed;
   float width;
   bool from_player;

   void setup(bool f_p, ofPoint p, float s, ofImage * bullet_image);
   void update();
   void draw();

   ofImage * img;
};
Our Bullet.cpp will look like this:
void Bullet::setup(bool f_p, ofPoint p, float s, ofImage * bullet_image) {
   from_player = f_p;
   pos = p;
   speed = s + 3;
   img = bullet_image;
   width = img->width;

}
void Bullet::update() {
   if (from_player) {
       pos.y -= speed;
   } else {
       pos.y += speed;
   }
}
void Bullet::draw() {
   img->draw(pos.x - width/2, pos.y - width/2);

}
Again, this is much like the code for the player, but with two differences:
- We keep track of where the bullet comes from, and alter the code based on that variable (meaning we can keep all the bullets in the same vector)
- When instantiating a bullet, we check to see the position of the shooter, as well as the shooter's current speed (so it will always move faster than the thing that shot it)
Now that our bullet class is implemented, we can go back to ofApp::setup() and add enemy_bullet_image.loadImage("enemy_bullet.png"); and player_bullet_image.loadImage("player_bullet.png"); right underneath where we loaded in our player_image.
For now, our update_bullets() function will call the update() function in each bullet, and will also get rid of bullets that have flown offscreen in either direction.
//--------------------------------------------------------------
void ofApp::update_bullets() {
   for (int i = 0; i < bullets.size(); i++) {
       bullets[i].update();
       if (bullets[i].pos.y - bullets[i].width/2 < 0 || bullets[i].pos.y + bullets[i].width/2 > ofGetHeight()) {
           bullets.erase(bullets.begin()+i);
       }
   }
   // we'll call a collision check function here shortly
}
Our ofApp::update() and ofApp::draw() will now look like this:
//--------------------------------------------------------------
void ofApp::update(){
   if (game_state == "start") {

   } else if (game_state == "game") {
       player_1.update();
       update_bullets();
   }
}
//--------------------------------------------------------------
void ofApp::draw(){
   if (game_state == "start") {

   } else if (game_state == "game") {
       ofBackground(0,0,0);
       player_1.draw();

       for (int i = 0; i < bullets.size(); i++) {
           bullets[i].draw();
       }
   } else if (game_state == "end") {

   }
}
Finally, let's add an if-statement to our keyPressed() so that when we press the spacebar during the game, we spawn a player bullet:
//--------------------------------------------------------------
void ofApp::keyPressed(int key){
   if (game_state == "game") {
       if (key == OF_KEY_LEFT) {
           player_1.is_left_pressed = true;
       }

       if (key == OF_KEY_RIGHT) {
           player_1.is_right_pressed = true;
       }

       if (key == OF_KEY_UP) {
           player_1.is_up_pressed = true;
       }

       if (key == OF_KEY_DOWN) {
           player_1.is_down_pressed = true;
       }

       if (key == ' ') {
           Bullet b;
           b.setup(true, player_1.pos, player_1.speed, &player_bullet_image);
           bullets.push_back(b);
       }
   }
}
Remember, the first parameter in the bullet's setup is whether it comes from the player (which, in this case, is always true). Run your app and fly around shooting for a bit to see how it feels.
Adding adversaries
Let's move on to our enemy. This process should be familiar by now. Add an ofImage enemy_image and a vector<Enemy> enemies to ofApp.h. Additionally, add float max_enemy_amplitude and float max_enemy_shoot_interval to ofApp.h. These are two of the enemy parameters we'll affect with OSC. Your enemy class will look like this:
class Enemy {
public:
   ofPoint pos;
   float speed;
   float amplitude;
   float width;

   float start_shoot;
   float shoot_interval;

   void setup(float max_enemy_amplitude, float max_enemy_shoot_interval, ofImage * enemy_image);
   void update();
   void draw();
   bool time_to_shoot();

   ofImage * img;
};
Our enemy's horizontal movement will be shaped by the values fed to a sine wave (which we'll see in a moment). We'll keep track of our amplitude variable so different enemies can have different amplitudes. We'll also want to keep track of whether enough time has passed for this enemy to shoot again, which utilizes the start_shoot and shoot_interval variables. Both of these variables will actually be set in our setup() function. Finally, we'll have a boolean function that will tell us whether the enemy can shoot this frame or not. Our enemy class will look like this:
void Enemy::setup(float max_enemy_amplitude, float max_enemy_shoot_interval, ofImage * enemy_image) {
   pos.x = ofRandom(ofGetWidth());
   pos.y = 0;
   img = enemy_image;
   width = img->width;
   speed = ofRandom(2, 7);
   amplitude = ofRandom(max_enemy_amplitude);
   shoot_interval = ofRandom(0.5, max_enemy_shoot_interval);
   start_shoot = ofGetElapsedTimef();
}
void Enemy::update() {
   pos.y += speed;
   pos.x += amplitude * sin(ofGetElapsedTimef());
}
void Enemy::draw() {
   img->draw(pos.x - width/2, pos.y - width/2);
}
bool Enemy::time_to_shoot() {
   if (ofGetElapsedTimef() - start_shoot > shoot_interval) {
       start_shoot = ofGetElapsedTimef();
       return true;
   }
   return false;
}
In update, we're using the current elapsed time, in frames, to give us a constantly increasing number to feed to the sine function, which in turn returns a value between -1 and 1. We multiply it by the amplitude of the wave, making this curve more or less exaggerated.
In time_to_shoot(), we check to see whether the difference between the current time and the time this enemy last shot is greater than the enemy's shooting interval. If it is, we set start_shoot to the current time, and return true. If not, we return false. Let's integrate our enemies into the rest of our ofApp.cpp:
//--------------------------------------------------------------
void ofApp::setup(){
   game_state = "start";

   max_enemy_amplitude = 3.0;
   max_enemy_shoot_interval = 1.5;

   enemy_image.loadImage("enemy0.png");
   player_image.loadImage("player.png");
   enemy_bullet_image.loadImage("enemy_bullet.png");
   player_bullet_image.loadImage("player_bullet.png");

   player_1.setup(&player_image);
}
//--------------------------------------------------------------
void ofApp::update(){
   if (game_state == "start") {

   } else if (game_state == "game") {
       player_1.update();
       update_bullets();

       for (int i = 0; i < enemies.size(); i++) {
           enemies[i].update();
           if (enemies[i].time_to_shoot()) {
               Bullet b;
               b.setup(false, enemies[i].pos, enemies[i].speed, &enemy_bullet_image);
               bullets.push_back(b);
           }
       }
   } else if (game_state =="draw") {
   }
}
//--------------------------------------------------------------
void ofApp::draw(){
   if (game_state == "start") {
   } else if (game_state == "game") {
       ofBackground(0,0,0);
       player_1.draw();
       for (int i = 0; i < enemies.size(); i++) {
           enemies[i].draw();
       }
       for (int i = 0; i < bullets.size(); i++) {
           bullets[i].draw();
       }
   } else if (game_state == "end") {
   }
}
Collisions
Let's implement our bullet collision checks. Add a void check_bullet_collisions() to your ofApp.h, then write the following function:
//--------------------------------------------------------------
void ofApp::check_bullet_collisions() {
   for (int i = 0; i < bullets.size(); i++) {
       if (bullets[i].from_player) {
           for (int e = enemies.size()-1; e >= 0; e--) {
               if (ofDist(bullets[i].pos.x, bullets[i].pos.y, enemies[e].pos.x, enemies[e].pos.y) < (enemies[e].width + bullets[i].width)/2) {
                   enemies.erase(enemies.begin()+e);
                   bullets.erase(bullets.begin()+i);
                   score+=10;
               }
           }
       } else {
           if (ofDist(bullets[i].pos.x, bullets[i].pos.y, player_1.pos.x, player_1.pos.y) < (bullets[i].width+player_1.width)/2) {
               bullets.erase(bullets.begin()+i);
               player_1.lives--;

               if (player_1.lives <= 0) {
                   game_state = "end";
               }
           }
       }
   }
}
This code is a bit nested, but actually pretty simple. First, it goes through each bullet in the vector and checks to see whether it's from the player. If it's from the player, it starts a for-loop for all the enemies, so we can compare the player bullet position against all the enemy positions. We use ofDist() to see whether the distance between a given bullet and a given enemy is less than the sum of their radii--if it is, they're overlapping. If a bullet is not from the player, the function does a distance calculation against the player, to see whether a given enemy bullet and the player are close enough to count it as a hit. If there is a hit, we subtract a player's life and erase that bullet. If the player has less than or equal to 0 lives, we change the game state to the end.
Don't forget to call check_bullet_collisions() as part of update_bullets():
//--------------------------------------------------------------
void ofApp::update_bullets() {
   for (int i = 0; i < bullets.size(); i++) {
       bullets[i].update();
       if (bullets[i].pos.y - bullets[i].width/2 < 0 || bullets[i].pos.y + bullets[i].width/2 > ofGetHeight()) {
           bullets.erase(bullets.begin()+i);
       }
   }
   check_bullet_collisions();
}
Our game's brain
Great! Except… we don't have any enemies yet! Definitely an oversight. This is where our level controller comes in. Add LevelController level_controller; to your ofApp.h.
Our level controller class is super simple:
class LevelController {
public:
   float start_time;
   float interval_time;

   void setup(float e);
   bool should_spawn();
};
As you might guess, all it'll really do is keep track of whether it's time to spawn another enemy yet.
Inside our LevelController.cpp:
void LevelController::setup(float s) {
   start_time = s;
   interval_time = 500;
}
bool LevelController::should_spawn() {
   if (ofGetElapsedTimeMillis() - start_time > interval_time) {
       start_time = ofGetElapsedTimeMillis();
       return true;
   }
   return false;
}
When we set up our level controller, we'll give it a starting time. It'll use this time as a baseline for the first enemy spawn. The should_spawn code should look familiar from the enemy bullet section.
We'll wait to set up our level controller until the game actually starts, namely, when the game state changes from "start" to "game".
void ofApp::keyReleased(int key){
   if (game_state == "start") {
       game_state = "game";
       level_controller.setup(ofGetElapsedTimeMillis());
   }

  ...
}
Next we'll integrate it into our ofApp::update():
//--------------------------------------------------------------
void ofApp::update(){
   if (game_state == "start") {

   } else if (game_state == "game") {
       player_1.update();
       update_bullets();

       for (int i = 0; i < enemies.size(); i++) {
           enemies[i].update();
           if (enemies[i].time_to_shoot()) {
               Bullet b;
               b.setup(false, enemies[i].pos, enemies[i].speed, &enemy_bullet_image);
               bullets.push_back(b);
           }
       }

       if (level_controller.should_spawn() == true) {
           Enemy e;
           e.setup(max_enemy_amplitude, max_enemy_shoot_interval, &enemy_image);
           enemies.push_back(e);
       }
   }
}
Awesome! We're close to done!
Bonus lives
Before we finish, let's add in our last OSC feature: the ability to throw in bonus lives on the fly. Add vector<Life> bonuses and ofImage life_image to your ofApp.h. To keep our code modular, let's also add void update_bonuses() in the same place. Don't forget to life_image.loadImage("life_image.png") in ofApp::setup().
Life.h should look like this:
class Life {
public:
   ofPoint pos;
   float speed;
   float width;

   ofImage * img;

   void setup(ofImage * _img);
   void update();
   void draw();
};
It'll function like this (a lot like the bullet):
void Life::setup(ofImage * _img) {
   img = _img;
   width = img->width;
   speed = 5;
   pos.x = ofRandom(ofGetWidth());
   pos.y = -img->width/2;
}
void Life::update() {
   pos.y += speed;
}
void Life::draw() {
   img->draw(pos.x - img->width/2, pos.y - img->width/2);
}
Our update_bonuses() function works a lot like the bullet collision function:
//--------------------------------------------------------------
void ofApp::update_bonuses() {
   for (int i = bonuses.size()-1; i > 0; i--) {
       bonuses[i].update();
       if (ofDist(player_1.pos.x, player_1.pos.y, bonuses[i].pos.x, bonuses[i].pos.y) < (player_1.width + bonuses[i].width)/2) {
           player_1.lives++;
           bonuses.erase(bonuses.begin() + i);
       }

       if (bonuses[i].pos.y + bonuses[i].width/2 > ofGetHeight()) {
           bonuses.erase(bonuses.begin() + i);
       }
   }
}
All that's left for our lives functionality is to alter ofApp::update() and ofApp::draw().
//--------------------------------------------------------------
void ofApp::update(){
   if (game_state == "start") {

   } else if (game_state == "game") {
       player_1.update();
       update_bullets();
       update_bonuses();

       for (int i = 0; i < enemies.size(); i++) {
           enemies[i].update();
           if (enemies[i].time_to_shoot()) {
               Bullet b;
               b.setup(false, enemies[i].pos, enemies[i].speed, &enemy_bullet_image);
               bullets.push_back(b);
           }
       }

       if (level_controller.should_spawn() == true) {
           Enemy e;
           e.setup(max_enemy_amplitude, max_enemy_shoot_interval, &enemy_image);
           enemies.push_back(e);
       }
   }
}
//--------------------------------------------------------------
void ofApp::draw(){
   if (game_state == "start") {
       start_screen.draw(0,0);
   } else if (game_state == "game") {
       ofBackground(0,0,0);
       player_1.draw();
       draw_lives();

       for (int i = 0; i < enemies.size(); i++) {
           enemies[i].draw();
       }

       for (int i = 0; i < bullets.size(); i++) {
           bullets[i].draw();
       }

       for (int i = 0; i < bonuses.size(); i++) {
           bonuses[i].draw();
       }
   } else if (game_state == "end") {

   }
}
Let's get visual
Finally! We've been a bit stingy with visual feedback, so let's add in a start screen, a score, a visual representation of the lives left, and an end screen. Add ofImage start_screen;, ofImage end_screen;, void draw_lives();, and void draw_score(); to ofApp.h.
Change ofApp::setup() to load in those assets:
//--------------------------------------------------------------
void ofApp::setup(){
    ...
   player_1.setup(&player_image);
   start_screen.loadImage("start_screen.png");
   end_screen.loadImage("end_screen.png");
   score_font.loadFont("Gota_Light.otf", 48);
}
Draw them in the appropriate game states using start_screen.draw(0, 0) and end_screen.draw(0, 0).
Add in the last two functions:
//--------------------------------------------------------------
void ofApp::draw_lives() {
   for (int i = 0; i < player_1.lives; i++) {
       player_image.draw(ofGetWidth() - (i * player_image.width) - 100, 30);
   }

}
//--------------------------------------------------------------
void ofApp::draw_score() {
   if (game_state == "game") {
       score_font.drawString(ofToString(score), 30, 72);
   } else if (game_state == "end") {
       float w = score_font.stringWidth(ofToString(score));
       score_font.drawString(ofToString(score), ofGetWidth()/2 - w/2, ofGetHeight()/2 + 100);
   }
}
By using stringWidth(), we can calculate the width of a string and shift the text over (handy for centering it).
All that's left after that is to call draw_score() and draw_lives() during the ofApp::draw()'s game state, and to call draw_score() during the end state.
Congrats–you made a game!
Linking oF and OSC
Now let's add in the OSC functionality. We are going to set our application up to receive messages from our iPad and then make changes in real-time while our game is running to test some possible player scenarios. As mentioned before, this can trump going into your application and making manual changes because you skip the need to recompile your game and playtest live. In fact, you can even use TouchOSC to open up new ways to interact with your players.

TouchOSC is used to switch game levels on the fly and to run challenges.
To accomplish this we are going to create a new class that will contain our OSC functionality. Create a .cpp and .h file for this class now and name it LiveTesting. Open LiveTesting.h And let's add the line to import the OSC at the top of your file after your preprocessor directives and also a line for using iostream for testing purposes. As we add the code we will explain inline in code comments.
Add the following:
#include <iostream>
#include "ofxOsc.h"
Next let's set up all of the variables we are going to use to receive OSC data and map it to game values. Add the following code into your class:
class LiveTesting
{
public:
    LiveTesting();
    //a default c++ constructor
    void setup();	//for setup
    void update(); //for updating

    ofxOscSender sender;
    //you can set up a sender!
    //We are going to use this network connection to give us
    //some visual feedback of our current game values.

    ofxOscReceiver receiver;
    //this is the magic! This is the port on which your game gets incoming data.

    ofxOscMessage m;
    //this is the osc message your application gets from your device.


    //these are the values we will be tweaking during testing
    float max_enemy_amplitude;
    int interval_time;
    float max_enemy_shoot_interval;
    bool triggerBonus;

};
Now let's jump over to the LiveTesting.cpp file. In this file we are going to set up our network address and the ports we are sending and receiving data on as the first order of business. However, to go any further we are going to need to do some housekeeping and install additional software. For OSC to work it will need a local wifi network to send the messages across. (Note this tactic may not work for a network outside of your own because often a sysadmin will stop this kind of traffic from being transmitted on a very public network. We suggest bringing an Airport Express or something similar with you so you can quickly and wirelessly establish a local network for play testing.)
For the purpose of this chapter and to allow us to create an experience that will work on both Android and iOS, we are going to use a piece of software called TouchOSC from this URL: http://hexler.net/software/touchosc
The desktop editor software is free, however, the matching software for your device will be $4.99. Get both now. As a matter of principle, we endorse building your own tools and you could easily build a second oF project to be your OSC sender and receiver on your mobile device. With that said, nothing beats TouchOSC for speed, ease of use, and complete, platform independent flexibility. If you are someone who often moves between an iOS and Android device on both Windows and Mac, this tool will become indispensible to you. As a game's designer it can open up possibilities like changing levels on the fly, updating game variables, adjusting for-player feedback, and adding new features into and taking them out of your game as it's running. We highly endorse using it and support the continued advancement of the tool. You can also use it with music production tools like Ableton Live and it comes with great presets for things like DJing and mixing music live. Go to the app store of your device and purchase the mobile version now if you would like to continue down this route.
After we get all of the tools downloaded and installed, let's start setting everything up. You are going to need two bits of information. You are going to need to know the IP address of your computer and the IP address of your laptop. If you are on a Mac, just open up your System Preferences. Go to the Network setting and click on your WiFi connection in the left sidebar. On the right side it will display your IP address. You can also get this setting by opening up Terminal and entering in the command "ifconfig." Terminal will list every network that's a possible connection for your machine from the past, even if it's not currently active. For example, if you have ever connected your phone, it will be in the list with some flag and listed as inactive. Look for the connection that's currently active. It will look something like this:
en1: flags=8863<UP,BROADCAST,SMART,RUNNING,SIMPLEX,MULTICAST> mtu 1500
	ether 60:33:4b:12:e5:3b
	inet6 fe80::6233:4bff:fe12:e53b%en1 prefixlen 64 scopeid 0x5
	inet 192.168.0.5 netmask 0xffffff00 broadcast 192.168.0.255
	media: autoselect
	status: active
The inet address is your current IP.
On Windows, open the charms bar. In search type cmd and open the command prompt. Type in ipconfig. This information is much clearer than the data dump from terminal. The connected listed as your Wireless LAM adapter Wi-Fi will list your current IPv4 address. This is your IP address. Finally, obtain your mobile device's IP address as well from your device settings. Make a note of your IP address for the next section.
At this point, go ahead and launch TouchOSC on your device and the TouchOSC desktop editor on your computer. If you are on Windows, you will need to make sure you have Java installed first. Once the software is open, click the open icon in the top tool bar. In the file containing the code for this chapter you will see a file called ofBook.touchosc.
We are going to make this interface now and deploy it to our phone. We will make this interface to control certain parameters in our game:
//these are the values we will be tweaking during testing
float max_enemy_amplitude;
int interval_time;
float max_enemy_shoot_interval;
bool triggerBonus;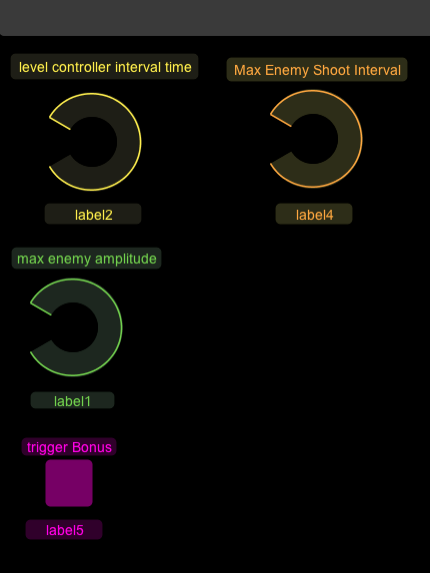
To build the app, let's start by adding our first knob. Right click in the black empty space to the right. Choose to make a rotaryH. Next make two labelH objects. The first one will be the name of our knob. The second one will be for displaying the value of the current variable in our game. Place one label above the knob and one below. It should look like this:

Now look to the left side of the app. At this point, it's time to set all of the values this knob will be sending and what the labels will display. Let's start with label1. We will name our knob on screen to make things easier to read. The first value in our game we want to control, the level controller interval time, should be what this label reads onscreen. Changing the name field in the app interface will do little. However, note under the name field you can change the color of the label. For this example, use yellow. Next, jump down to the next to last field on screen called Text. You will want to set this to 'level controller interval time'.
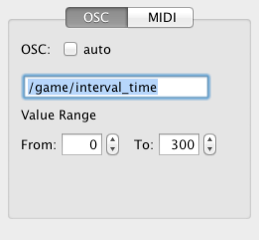
Moving on, select the knob. This one will require more set up because it will actually be sending values to our game. Color it yellow first. In the dark grey OSC box set all of the values we need to receive for the game. If auto is checked, uncheck it. Now customize the text in that box to /game/interval_time. In the From fields set the parameters to a range of values to try out in the game during a playtest. We will use from 0 to 300. These two elements, the tag, and the parameters will get packed up into a message and sent over our OSC network to our game when values change.
The last thing to set up will be the bottom label to display what our interval variable is currently set to in our running game. Select it. We will change the settings and the address tag to reflect that it is not game data being sent to our game but rather data being sent out of our game. Select the label on screen to pull up the parameters for it on the right. In the darkened OSC box change the parameters to those below:

This is the pattern we are going to use for all of our knobs and labels. Essentially, the pattern is:
- Create three interface elements for each parameter
- A label for the name of the parameter you will be controlling
- An interface element like a knob to change the parameter
- An output label to display the current in game variable setting
Do this now for the other two knobs. The settings are below for each one.
Label / Knob Set Two
- Label H
- Color: orange
- Text: Max Enemy Shoot Interval
- Rotary H
- Color: orange
- OSC: /game/max_enemy_shoot_interval
- Value Range: From: 0 To: 1
- Label H
- Color: Orange
- OSC: /updatedVals/max_enemy_shoot_interval
Label / Knob Set Three
- Label H
- Color: Green
- Text: max enemy amplitude
- Rotary H
- Color: Green
- OSC: /game/max_enemy_amplitude
- Value Range: From: 0 To: 1
- Label H
- Color: Green
- OSC: /updatedVals/max_enemy_amplitude [KL: The first two oranges on the list aren't capitalized like the remaining colors. I didn't want to change it without double checking that they aren't lowercase for a reason. If that's not the case, I'd capitalize them for consistency.] Set Four
We are going to add one more but this one will be a Push Button instead of a RotaryH. Right click to create it just like the knob. Make the Push Button and two labels. Here are the settings:
- Label H
- Color: Pink
- Text: Trigger Bonus
- Push Button
- Color: Pink
- OSC: /game/triggerBonus
- From: 0 To: 1
- Label H
- Color: Pink
- OSC: /updatedVals/triggerBonus
Save your file to your hard drive desktop and name it PlaytestInterface.
You are done building your interface for play testing. Now let's deploy it! On your mobile device, launch TouchOSC. It will launch and open a settings screen.
This is when we need the network address of your computer we retrieved earlier. Under Connections, touch OSC: [KL: Is this colon intentional? Unfortunately I can't follow this part of the tutorial right now to know for sure.] and set it to the IP address of your computer to link the two. It should look something like 192.165.0.3.
The ports also need set. Tap each one and set them to these values:
Port (outgoing) 8001
Port (incoming) 8000
Next tap TouchOSC in the upper left corner of the app to go back to the settings.
Now click on Layout. Then tap Add. It will start to search for your computer. Switch back over to your computer now and into the TouchOSC Editor. Press the green Sync arrow.

Switch back to your device. You should see your computer listed under FOUND HOSTS. Select it. It will pop back to the settings screen. Scroll down and find PlaytestInterface in the list of interfaces. Select it and it will take you back to the main menu. Press Done in the upper left corner and your interface will now launch. If you want to get back to the settings screen at any point, the white dot in the upper right-hand corner will return the user interface to that screen.
Finally, TouchOSC is set up! Let's link it to our game and run our very first playtest. Go back to the programming IDE. Open LiveTesting.cpp. In our default constructor, we will now set up our game to send and receive values over the network. To do this we will need to know which IP address and port on our device we will send to as well as set up a port on our local computer's network to receive incoming data. Your computer will have only one IP address but it can send and receive data on thousands of ports. We aren't going into too much detail about ports, but you can think of the IP address like a boat pier. Lots of boats can be docked at a single pier. This is no different. Your ports are your docks and your IP address is your pier. You can think of the data like the people departing and arriving. You'll need a separate port for each activity in this scenario. If a port isn't used by your operating system, you can send and receive data there. [KL: since IP addresses were mentioned earlier, maybe this analogy should also be introduced earlier.] We are going to use 8000 and 8001. The final thing to establish is the address pattern. It will look like a file path and allow us to specify that our messages match to their right values. Add this code:
#include "LiveTesting.h"

LiveTesting::LiveTesting(){

    sender.setup("192.168.0.11", 8000);
    //this is the IP address of your iOS/Android device and the port it should be
    //set to receive on

	receiver.setup(8001);
    /*this is the port your game will receive data on.
    For us this is the important one! Set your mobile device to send on this port.*/

    m.setAddress("/game");

    /*This is OSC's URL like naming convention. You can use a root URL address like
     structure and then everything under that address will be accessible by that message.

   	 It's very similar to a folder path on your hard drive. You can think of the
     game folder as your root directory and all the bits that are
     /game/someOtherName are inside of it.*/
}
In the above code we simply set up our network address, incoming and outgoing ports and created a default address pattern. From here we should be good to set up the messages we'd like to send and receive in our code. Let's move on to the next major function we want to write. We need to run an update function in this class to update every frame so we can make sure that if we move a slider on our mobile device that change becomes reflected within the game. Also, we might want to send that value back out once we receive it so we can get some visual feedback on our device to let us know what our current settings are.
Each time we make a change on our device, it will send over the updates to our code via TouchOSC. We want to make sure we get all of the incoming messages that are being sent so we will create a simple while loop. We will loop through the whole list of messages that came into our game that frame and match it to the corresponding variable in our game via if statements.
  while (receiver.hasWaitingMessages()) {
        //get the next message
        ofxOscMessage m;
        receiver.getNextMessage(&m);
Every incoming message will come with its own unique address tag and new arguments. You can get access to a message's address via the getAddress function. For example,if(m.getAddress() == "/game/max_enemy_amplitude"), will test to see if the message address is /game/max_enemy_amplitude. If it is, set the variable equal to that value in your game's codebase so they are linked together. Every swipe of the knob will translate to direct changes in your game. We do this for every single value we want to set.
	if(m.getAddress() == "/game/max_enemy_amplitude")
        {
            max_enemy_amplitude = m.getArgAsFloat(0);

            //these values send back to OSC to display the
            //current settings for visual feedback
            sendBack.addFloatArg(max_enemy_amplitude);
            sendBack.setAddress("/updatedVals/max_enemy_amplitude");
            sender.sendMessage(sendBack);

            cout << max_enemy_amplitude << endl;
        }
At the same time, we are also going to send those exact same values back out to our device so we can see the numbers that the settings in our game are currently at. [KL: You might want to make this sentence more concise, preferably not ending with "at."] This is handy for two reasons. One, you get visual feedback of the current variables' values on your device. Two, if you happen to land on settings that feel right in your game, you can take a screen cap on your device. After stopping the game, go back and change the variables to match in your code and the next time you run your program, it will start with those parameters.
To pack up all of the values in our current running game and send them back to the device every frame, we will create a variable of type ofxOscMessage called sendBack. When we have a string match for the address in the ofxOscMessage m, we just copy the arguments over to sendBack via the right function (in this case usually addFloatArg) and set the address pattern using the setAddress function. Finally, we use the built in sendMessage function to send the message out over OSC.
Here's the complete code to add to your LiveTesting.cpp file
void LiveTesting::update()
{
    //our simple while loop to make sure we get all of our messages
    while (receiver.hasWaitingMessages()) {

        //Get the message, which will hold all of our arguments inside of it.
        //It's a collection of data

        ofxOscMessage m;
        //Pass a reference to that message to the receiver
        //we set up above using the getNextMessage function in the OSC add on.

        receiver.getNextMessage(&m);

        //This will be the message we send back from our game
        //to our device letting it know what value we received
        //from it and displaying that back to us so we know what our
        //current game settings are at.

        ofxOscMessage sendBack;

        //Remember our address tags are unique.
        //We set up the /game tag as our root address and each "/" denotes a sub tag.
        //If these strings are a match, we know the message that came in is our
        //amplitude.

        if(m.getAddress() == "/game/max_enemy_amplitude")
        {

            //This is critical.
            //Each type must match if you want to be able to run your code.
            //We know the first argument in our array of messages
            //will be a float if the above if statement evaluates to true.

            max_enemy_amplitude = m.getArgAsFloat(0);

            //Now we are going to pack up a collection of data to send back to
            //our device.
           //sendBack is also a collection of data we
            //add arguments to.
            //Add the value we set for our amplitude to the message and move on.

            sendBack.addFloatArg(max_enemy_amplitude);
            sendBack.setAddress("/updatedVals/max_enemy_amplitude");
            sender.sendMessage(sendBack);

            cout << max_enemy_amplitude << endl;
        }

        else if (m.getAddress() == "/game/interval_time")
        {
            //This is exactly the same as above.
            //We are simply testing to see if the address
            //tag is this value, and if so, doing the exact
            //process of setting our ingame value to match the value of the
   			//incoming argument and sending back our interval_time to our device.

            interval_time = m.getArgAsInt32(0);

            //Send visual feedback.
            sendBack.addIntArg(interval_time);
            sendBack.setAddress("/updatedVals/interval");
            sender.sendMessage(sendBack);
        }
        else if (m.getAddress() == "/game/max_enemy_shoot_interval")
        {
            //again the same process of testing the address tag
            max_enemy_shoot_interval = m.getArgAsFloat(0);

            //Send visual feedback.
            sendBack.addFloatArg(max_enemy_shoot_interval);
            sendBack.setAddress("/updatedVals/max_enemy_shoot_interval");
            sender.sendMessage(sendBack);

        }
        else if (m.getAddress() == "/game/triggerBonus")
        {
            //Finally we wrap it up. This is last test.
            triggerBonus = m.getArgAsInt32(0);
            cout << triggerBonus << endl;
            //Send visual feedback.
            sendBack.addIntArg(triggerBonus);
            sendBack.setAddress("/updatedVals/triggerBouns");
            sender.sendMessage(sendBack);


        }
    }
You have reached the end of the tutorial. [KL: Make this statement more congratulatory. It's a great accomplishment!] Now do a real testing session. Run the game and have a friend play it while you change the knobs. Once you have settings you like, quit the game and add those values into the code to make them permanent updates.
For a bonus challenge, find a few settings you like and create a difficulty ramp for the game using those values of time.
Resouces
We've reached the end of the chapter but not the end of the journey. A few great resources for independent games scene are listed here:
Come Out And Play
Kill Screen
Indiecade
Babycastles
Polygon
IDGA
Game Dev Net
Game Dev Stack Exchange
Gamasutra
Digra
Different Games
About us
This chapter was written by two members of the Code Liberation Foundation, Phoenix Perry and Jane Friedhoff. This organization teaches women to program games for free. Featuring game art by Loren Bednar. We build community, create safe spaces for women who want to learn to program in a non-male dominated setting and generally rock.
